


Quick Numbers
| First clinic wash | Day 2 post-op (day 1 is rest) |
|---|---|
| Crusts cleared | Days 10–14 |
| Shedding window | Weeks 2–8 |
| First visible growth | Months 3–4 |
| Near-final result | Month 12 frontal; crown 12–18 months |
Key Takeaways
| Early recovery pictures track skin healing, not graft survival; visible new growth usually starts around month 3 to 4. |
| Consistent light, distance, and dry hair matter more than camera quality when you compare recovery photos. |
| At our clinic, the first wash and donor bandage removal happen on day 2 after surgery, following a rest day. |
| Shedding between weeks 2 and 8 is expected and often makes the scalp look close to its pre-op state. |
| Spreading dark patches, pus, or pain that worsens after day 3 should be photographed and sent to the clinic promptly. |
It's day 9. You hold your phone above your head under the bathroom light, and the picture shows pink skin, a grid of tiny brown crusts, and a hairline that seems thinner than the one you saw in the mirror an hour ago. Is that normal? Most people searching for hair transplant recovery pictures want an answer to exactly that question, not a gallery of finished results. This article walks through the visual milestones a normal recovery produces, from the first 48 hours to month 12, and explains how to photograph your own scalp so that comparisons over time actually mean something. It complements the week-by-week recovery milestones by focusing on one question: what the camera should see at each stage, and which findings deserve a message to your clinic.
Why don't your recovery photos look like clinic before-and-after galleries?
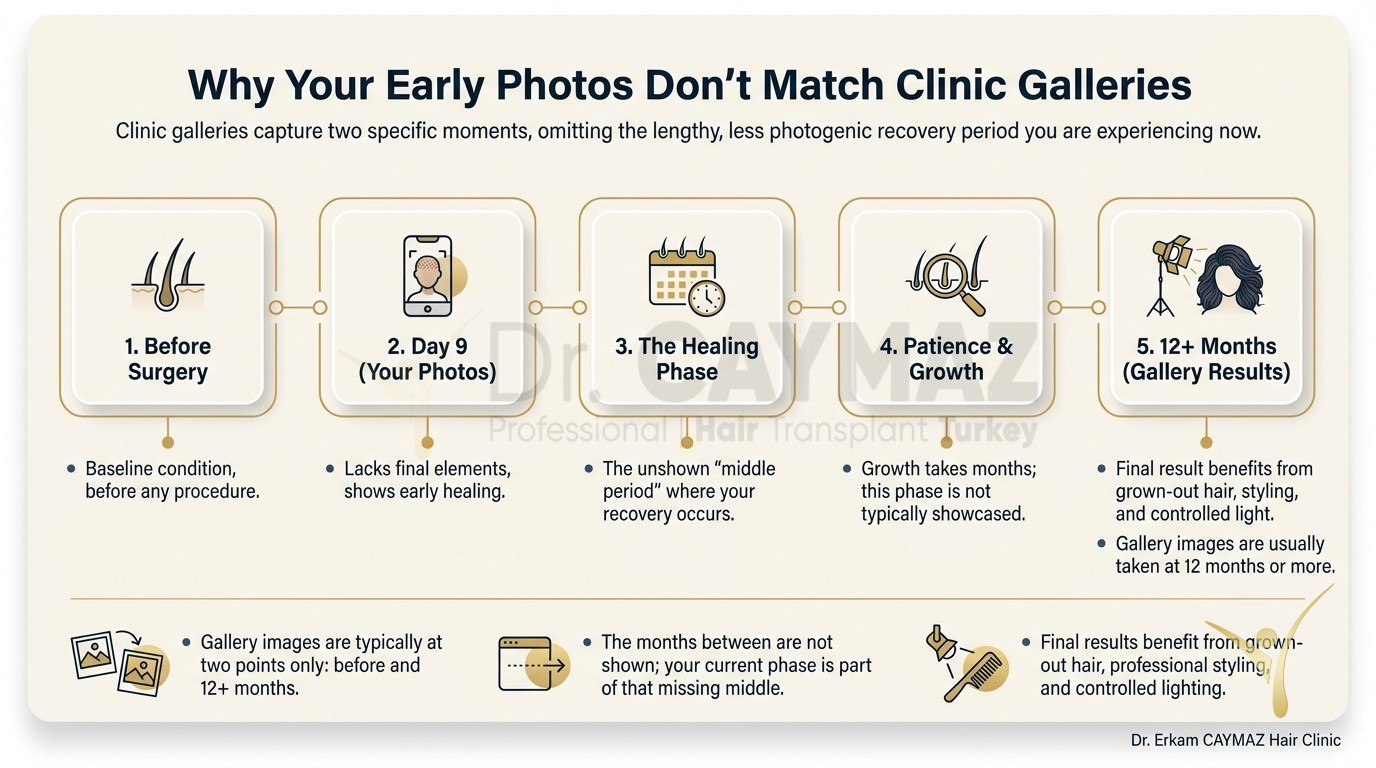
Gallery images are usually taken at two points only: before surgery and 12 months or more afterward. Everything between those dates is missing, and that middle period is where your own pictures live. A result photo also benefits from grown-out hair, styling, and controlled light. Your day-9 selfie has none of those advantages.
Biology works against early photos too. Transplanted follicles enter a resting phase within the first weeks, so the short hairs you see after surgery are mostly shafts that will fall out. The follicle stays under the skin. In other words, the visible hair in early pictures is not a measure of graft survival. Survival shows up months later, when new hairs grow from the same sites.
The skin itself adds distortion. Freshly implanted grafts sit in small channels surrounded by healing tissue, and pink skin reflects light differently from a normal scalp. Phone cameras often boost contrast automatically. That makes redness look deeper and density look lower than it appears in person. Once you know these distortions exist, your own images become much easier to read calmly.
How should you take recovery pictures you can actually compare?

A useful photo series depends on consistency, not camera quality. The same phone, the same spot in your home, and the same routine will tell you more than a professional camera used under changing conditions.
- Light: Stand facing a window in daylight. Avoid direct ceiling lights, which throw bright spots onto the scalp and exaggerate see-through areas.
- Flash: Leave it off for routine photos. Flash flattens texture and makes fine hair look sparse. Use it only for a close-up of a specific spot you want the clinic to assess.
- Distance: Hold the phone about 30 to 40 cm (12 to 16 inches) from the area. A selfie stick of fixed length or a mark on the floor keeps this constant.
- Hair state: Photograph dry hair without styling products, fibers, or oils. Wet hair clumps together and exposes the scalp.
- Timing: Take pictures at the same time of day, ideally before washing.
Views matter as much as light. Our standard set has seven angles: the front at eye level, the front with the head tilted down to show the hairline from above, the mid-scalp from directly overhead, the crown, the left temple, the right temple, and the donor area at the back of the head. If you had your consultation over WhatsApp or email, you already have baseline photos in most of these positions. Reuse them as your reference frame, matching head tilt and distance as closely as you can.
You don't need a photo every day. A practical schedule is day 1 after discharge, day 3, day 7, day 10, and day 14, then once a month until month 12. Daily pictures during weeks 3 to 12 tend to amplify worry, because changes in that period happen slowly and unevenly across the scalp.
What do normal pictures show in the first three days?
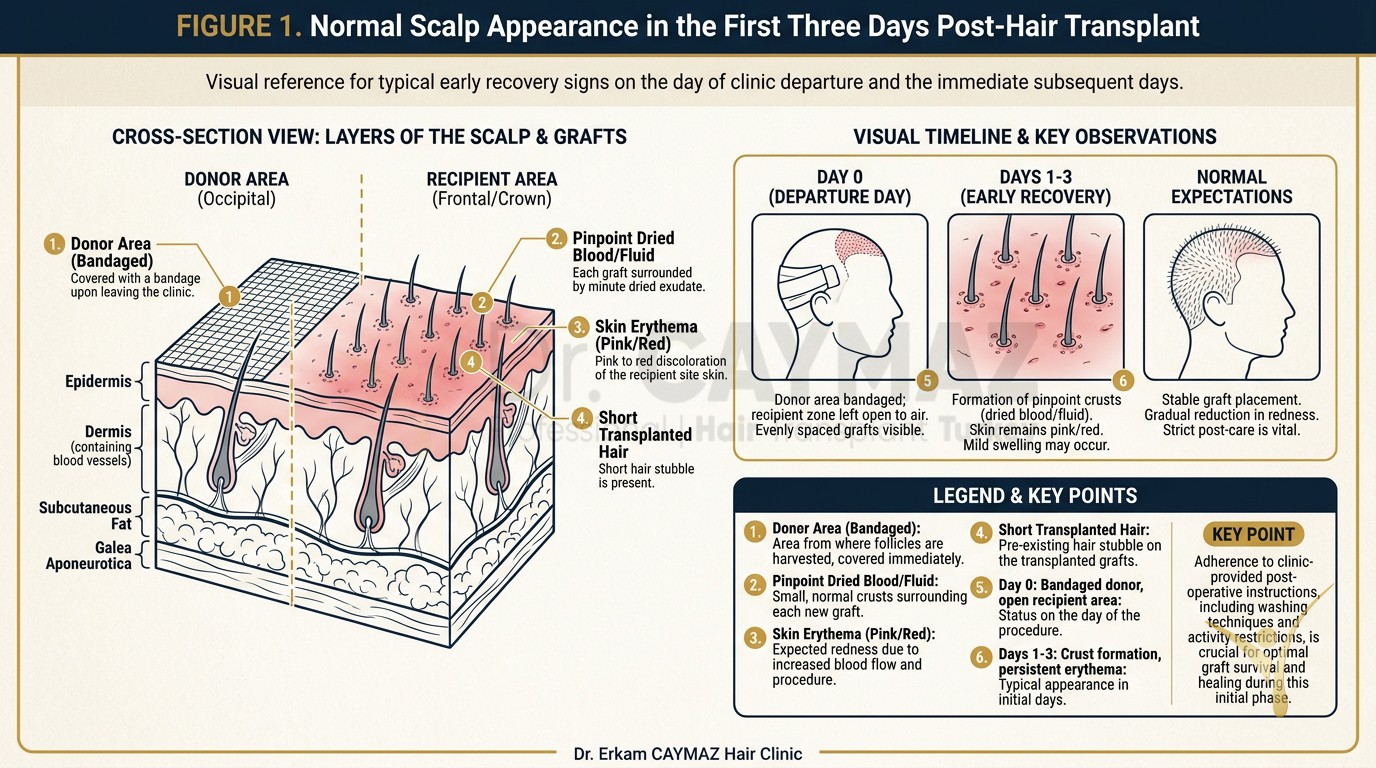
On the day you leave the clinic, the donor area is covered with a bandage and the recipient area is left uncovered. Photos of the recipient zone show evenly spaced grafts, each surrounded by a pinpoint of dried blood or clear fluid. The skin is pink to red. Short hair shafts stand at a consistent angle that matches the direction planned for each zone.
Small blood spots on the pillow after the first night are expected. During surgery, bleeding is controlled with epinephrine in the local anesthetic, firm gauze pressure, and a steady working pace, so what you see afterward is residual oozing rather than active bleeding. A picture showing fresh blood that keeps flowing after 10 minutes of gentle pressure with clean gauze is different. That warrants a call.
Day 1 is a rest day at our clinic. Our standard is the first clinic wash and bandage removal on day 2 after surgery. If your operation is on Monday, Tuesday is for rest and the first wash happens on Wednesday. Some clinics wash on day 1; we haven't seen problems with that approach, but we prefer to give the grafts an extra day to settle. Pictures taken after the wash usually look cleaner than the day before, because the team gently removes loose blood residue. The first post-transplant wash technique is demonstrated in person so you can repeat it at home.
Between day 2 and day 4, many patients notice forehead swelling. Anesthetic fluid drifts downward with gravity, so the forehead, and sometimes the skin around the eyes, looks puffy in photos. It's painless in most cases and resolves by day 5 to 7. Sleeping with the head raised at roughly 45 degrees for the first nights reduces it.
Donor photos after bandage removal show hundreds of small pink or red dots. Grafts are harvested using FUE (follicular unit extraction, which removes individual follicle groups one at a time) with a micromotor punch of 0.8–0.9 mm, so each dot measures under 1 mm across. The dots should be spread evenly across the safe donor zone, without clustered patches of bare skin.
How should the scalp look between day 4 and day 14?
This is the crust stage. Each graft is capped by a small, dry scab, and the recipient area can look like fine sandpaper or a scattering of brown and dark red dots. Gentle daily washing softens these crusts. They begin to lift from about day 7.
By day 10 to 14, most crusts should be gone. Patients often photograph the sink after washing and find tiny hairs with a crust attached to the end. That's normal: the shaft releases with the scab while the follicle stays anchored in the skin. A graft that has been in place for 10 days is securely set, and routine washing won't dislodge it. Following your hair transplant aftercare instructions during this stage matters more than any product.
Redness fades gradually. Bright red on day 3 usually becomes pink by day 10. People with fair or thin skin can stay pink for several weeks, and a light pink tone lasting 2 to 3 months is still within the normal range. Darker skin types often show less redness but may develop temporary darker spots around graft sites, which fade over the following weeks.
The donor area heals faster than the recipient zone. By day 7 to 10, the punch sites have closed, and by day 14 short regrowing hair usually hides them at arm's length. Photos taken with the donor hair clipped very short can still show faint dots, which become less visible as the hair lengthens. The donor area healing process follows its own schedule and typically settles weeks before the transplanted zone.
Dr. Caymaz Insight
| Almost every month, a patient sends me a photo taken under a bathroom ceiling light at week 8 and asks whether the grafts have failed. At that stage the picture shows exactly what I expect: shed shafts, pink skin, and a scalp that looks close to how it did before surgery. I ask them to retake it by a window, with dry hair, at the same distance as their consultation photos, and the panic usually fades. Before month 4, I'm not judging how much hair is visible. I'm looking at the skin: even color, no spreading dark crusts, no pus, and a donor area that has closed cleanly. |
Why do pictures from weeks 3 to 12 often look worse?
Between week 2 and week 8, most transplanted hairs shed. This is the resting phase described earlier, and it's the most common reason patients send worried photos. By week 6 to 8, an overhead picture can look close to the pre-op state, with pink skin and scattered short hairs. Clinicians sometimes call this the ugly duckling phase, and it's a normal part of the growth cycle.
Some patients also lose existing native hair around the recipient area, or occasionally in the donor zone. This is shock loss, a temporary shedding caused by surgical stress on nearby follicles. Pictures may show a hairline or mid-scalp that looks thinner than before surgery. In most cases the affected hairs regrow within 3 to 4 months. The causes and course of shock loss explain why it's more frequent in patients with ongoing miniaturization and how medication can lower the risk.
Weeks 6 to 12 can bring small pimple-like bumps, known as folliculitis, an inflammation around individual hair follicles. As new hairs push through the skin, some become trapped or irritated. In photos they appear as scattered red or white-headed spots, usually 1 to 3 mm across. Isolated spots are common and tend to settle with gentle washing and warm compresses. Don't squeeze them.
Clusters, painful spots, or bumps that keep increasing in number are a different matter and should be photographed and sent to the clinic. The overview of bumps and acne after transplantation covers when treatment is needed and what it involves.
The practical rule for this stage is simple: compare photos month to month, not day to day. A scalp at week 8 reveals almost nothing about the eventual result, and daily images mostly track shedding and skin tone.
What changes should photos show from month 4 to month 12?
New growth usually becomes visible in pictures between month 3 and month 4. The first hairs are fine, light in color, and sometimes curly or wiry, even when your native hair is straight. They emerge unevenly, with some zones ahead of others. The frontal area often shows growth earlier than the crown, because blood supply and hair cycling differ by region.
At month 6, many patients see roughly half of the expected growth. Hairs are still thinner in caliber than they'll eventually be. This is the point where photos start to look like progress, especially in the eye-level frontal view. Between month 6 and month 9, shafts thicken and darken, and texture normalizes. That increase in thickness changes the look of density more than the arrival of additional hairs does.
By month 12, the frontal and mid-scalp results are close to final. The crown may keep maturing for 12 to 18 months. How transplanted hair grows across this period varies with age, hair caliber, skin quality, and whether ongoing native loss is treated medically. Graft survival with a skilled team can reach up to 98%, while overall procedure success, meaning a result that meets the agreed plan, is around 90–95%. These are separate measures, and neither is a guarantee.
Month 12 photos also shape future planning. For patients at Norwood 4 or above, we recommend at least two sessions spaced a minimum of 6 months apart, rather than a single oversized session that strains the donor area. A standardized 12-month photo set shows where density is sufficient and where a second session would help most. Taking those pictures in the same seven positions used during planning makes the comparison straightforward.
Normal findings versus findings that need review
The table below pairs each recovery stage with what normal pictures usually show and what should prompt you to send photos to the clinic. Treat it as a reference for timing, not as a diagnostic tool.
| Stage | What normal pictures show | Photograph and contact the clinic if you see |
|---|---|---|
| Days 1–3 | Pink to red skin, pinpoint crusts, donor bandage, mild oozing | Bleeding that continues after 10 minutes of gentle pressure, rapidly rising pain, fever |
| Days 3–7 | Forehead swelling, even brown or dark red crusts | Swelling that increases after day 7, yellow or foul-smelling discharge |
| Days 7–14 | Crusts lifting, short shafts shedding with scabs, redness fading to pink | Thick crusts still firmly attached beyond day 16, gray or black patches of skin |
| Weeks 3–8 | Shedding of transplanted hairs, pink skin, possible shock loss | Hot, swollen, or painful areas; widespread pus |
| Weeks 6–12 | Occasional small pimples of 1–3 mm | Clusters of painful bumps, spreading redness |
| Months 3–6 | Fine, uneven early growth, sometimes curly | No visible new growth anywhere by month 7 |
| Months 6–12 | Thickening shafts, normalizing texture and color | Raised, bumpy graft sites or redness persisting beyond 6 months |
One finding deserves particular attention. Dark gray or black skin in a patch of the recipient area, often with a firm, leathery crust during the first 1 to 2 weeks, can indicate compromised blood supply to that tissue. It's rare, but early photos let the clinic assess it quickly. The overview of necrosis and graft infection after surgery explains how such cases are evaluated and managed.
Pictures can't show everything. Numbness, tightness, and itch are common after surgery and don't appear on camera. Mild itching during weeks 1 to 3 belongs to normal healing. Fever, chills, or pain that worsens after day 3 should be reported regardless of how the photos look.
How does your clinic use your recovery pictures?
Remote follow-up depends on your photos. International patients usually fly home a few days after surgery, so the clinic sees the scalp mainly through images sent over WhatsApp or email. Standardized pictures at day 10, month 1, month 3, month 6, month 9, and month 12 let the team compare like with like.
The operation plan, including technique and hairline, is built from your photos before you travel and isn't changed on surgery day. Those same reference images then become the baseline for judging your result. Dr. Erkam Caymaz personally reviews the consultation photos, designs the hairline, and opens the recipient channels with a V-shaped sapphire blade, while expert surgical technicians perform extraction and implantation under his supervision. When follow-up pictures arrive, the question isn't only whether hair is growing, but whether it's growing in the pattern and direction that were designed.
Send photos without filters, beauty modes, or cropping. Include one wide shot for context and one close shot of any spot that worries you. A short note with the post-op day and any symptoms saves a round of questions. With a schedule of 1 to 2 VIP operations per day and around 15 patients per month, follow-up images are reviewed individually, which makes a clear, consistent photo series worth the few minutes it takes.
Sources & clinical references
FAQ
In the first week, photos typically show pink to red skin, small brown or dark red crusts around each graft, and short hair shafts standing at an even angle. Forehead swelling often appears between day 2 and day 4 and settles by day 5 to 7. The donor area shows small pink dots under 1 mm across once the bandage is removed.
Our clinic standard is the first clinic wash and donor bandage removal on day 2 after surgery, with day 1 reserved for rest. For example, a Monday operation means rest on Tuesday and the first wash on Wednesday. Some clinics wash on day 1, and we have not seen problems with that approach, but we prefer day 2.
Most transplanted hairs shed between weeks 2 and 8 as follicles enter a resting phase. Some patients also experience shock loss of nearby native hairs. The follicles remain under the skin, and new growth usually becomes visible in pictures between month 3 and month 4.
Redness usually fades from bright red to pink by day 10. People with fair or thin skin can remain pink for several weeks, and a light pink tone lasting 2 to 3 months is still within the normal range. Redness persisting beyond 6 months should be reviewed with the clinic.
Yes. Between day 7 and day 14, crusts lift away and often carry the short hair shaft with them. The follicle stays anchored in the skin. After about 10 days, grafts are securely set and gentle routine washing will not dislodge them.
Stand facing a window in daylight, keep the flash off, hold the phone about 30 to 40 cm from your scalp, and photograph dry hair without products. Use the same seven angles each time: front at eye level, front tilted down, mid-scalp overhead, crown, both temples, and donor area.
Send photos promptly if you see gray or black patches of skin, yellow or foul-smelling discharge, clusters of painful bumps, swelling that increases after day 7, or bleeding that does not stop with gentle pressure. Fever or pain that worsens after day 3 should also be reported.
Frontal and mid-scalp results are usually close to final at month 12. The crown can continue to mature for 12 to 18 months. Hair caliber and texture keep improving between months 6 and 12, which changes the look of density considerably.
A practical schedule is day 10, month 1, month 3, month 6, month 9, and month 12. Send unfiltered, uncropped images with a short note stating the post-op day and any symptoms, plus one wide shot and one close-up of any area that concerns you.

Pre-Op Blood Tests and Medical Workup for Hair Transplant
A hair transplant consultation includes specific blood tests, a medication review, donor scalp assessment, and…
Read More: Pre-Op Blood Tests and Medical Workup for Hair Transplant
Temple Hair Transplant for Natural Hairline
Temple restoration can improve facial framing when direction and graft selection are highly controlled. The area is…
Read More: Temple Hair Transplant for Natural Hairline
Turkey Hair Transplant
Turkey hair transplant travel is common because experienced teams combine sapphire FUE, competitive pricing, and…
Read More: Turkey Hair Transplant
Hair Transplantation and the Effect of Scalp Tissue
Scalp tissue quality influences extraction safety, implantation response, and cosmetic durability. Temporary donor…
Read More: Hair Transplantation and the Effect of Scalp TissueFrequently Asked Questions
Professional Hair Transplant Insights by Dr. Erkam Caymaz