


Quick Numbers
| Typical FUE punch scar | Under 1 mm per extraction site |
|---|---|
| Norwood 6–7 long-term graft need (examples) | 6,000–7,000 total, often staged |
| Donor healing horizon | Up to 6 months for stable appearance |
| Responsible lifetime sessions (many patients) | 1–2 well-planned procedures |
Key Takeaways
| Density in the recipient zone must be matched by discipline in the donor zone. |
| Overharvesting causes patchy nape thinning and limits second sessions. |
| Homogeneous extraction (even spacing) protects long-term donor appearance. |
| Advanced baldness often needs staged planning, not one maximum graft day. |
Patients often ask how many grafts they can receive in one session. The better question is how many grafts the donor can surrender without visible damage. Hair transplantation is surgery: recipient density, extraction pattern, and future reserve must be planned together. This article explains how clinics balance plantation density with donor area density, why homogeneous FUE collection matters, and when advanced Norwood patterns require staged work instead of a single aggressive harvest.
Why Does Donor Balance Matter in Hair Transplantation?
Every graft removed from the nape or beard is permanent. Extracted follicles do not regrow at the donor site. If extraction is rushed to hit a marketing number, the top may improve while the back becomes the new cosmetic problem. Institutional clinics address this during the hair transplant consultation by mapping Norwood stage, safe yield, and zone priorities before surgery day.
That planning links directly to how grafts are distributed by zone. A strong frontal result loses credibility if the donor looks moth-eaten six months later.
What Is Overharvesting and How Does It Happen?
Overharvesting the donor area means extracting too many follicles overall, or clustering punches in one patch. The nape may look thin, patchy, or uneven under short hair. Norwood 6–7 patients who need 6,000–7,000 grafts long term are especially vulnerable if a clinic tries to collect an unsafe share in a single operation.
Overharvest is not only about total count. Two patients with the same graft number can have very different donor outcomes depending on spacing, punch size, and native donor density. This is why experience and magnification matter in FUE and DHI workflows.
| Factor | If ignored | Clinical goal |
|---|---|---|
| Extraction spacing | Visible patchiness, clustered bald dots | Homogeneous harvest across the safe zone |
| Total graft ceiling | Donor depletion, no reserve for session two | Match yield to Norwood plan and staging |
| Recipient density targets | Poor graft survival, unnatural pluggy look | Density that tissue blood supply can support |
| Technique (FUE / DHI / Sapphire) | Larger scars or transection waste | Minimal scar, intact follicle units |
Dr. Caymaz Insight
| I explain donor balance with a simple rule: the back of your head must still look like a healthy head of hair when we are finished. Chasing 6,000 grafts in one day on a borderline donor is how patients end up with a good front and a ruined nape. Even extraction spacing is not a detail; it is the difference between a donor that forgives a short haircut and one that does not. When I review photos at ten days, I am looking at both zones, not just the hairline. |
How Do FUE and DHI Affect Donor Scarring?
In follicular unit extraction (FUE), individual grafts are removed with micro punches. Scars are small, often under one millimeter, and usually fade into surrounding hair when extraction is even. DHI focuses on implantation tooling, but donor discipline still applies: the collection phase sets the ceiling for everything that follows.
Remember: extracted grafts never regrow at the donor site. Color, caliber, and curl of transplanted hair mirror what was taken. That is why selective, homogeneous harvesting protects both appearance and quality of the graft pool.
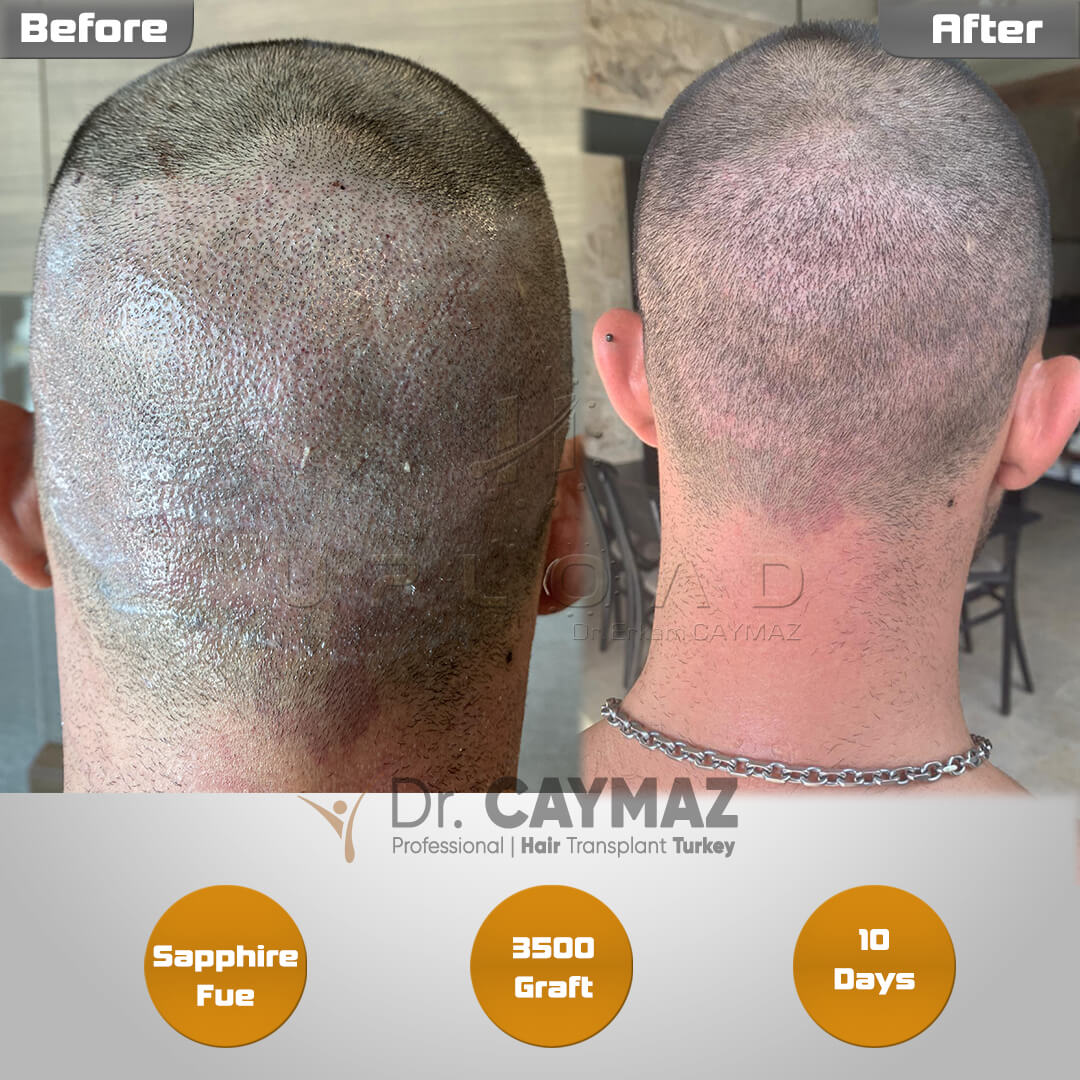
Ten-day healing example: even extraction supports a natural donor while the recipient zone recovers.
How Should Advanced Norwood Patterns Be Planned?
When the frontal and crown zones merge (Norwood 6–7), graft demand rises sharply. Responsible planning may split work across sessions, prioritize the visible frame, and leave donor reserve for refinement. Trying to “finish everything” in one pass often means thin coverage everywhere or an overused donor.
Pair surgical staging with realistic design goals. A natural hairline proportion and balanced mid-scalp density usually outperform a wide but sparse map. Patients who may not be ideal for large single-session harvests should discuss alternatives during candidacy review.
What Should You Expect During Donor Recovery?
Donor healing follows clinic aftercare instructions. The recipient area needs strict no-touch rules early on; donor washing is introduced on a defined schedule. Full maturation of transplanted grafts takes months; donor redness and texture normalize over weeks. If you are comparing techniques, ask how the team measures safe yield per cm², not only maximum advertised graft counts.
Density without donor damage is the definition of a sustainable transplant. When extraction is homogeneous, scars stay small, reserve remains for a second session if needed, and the result still looks like you, not like a corrected top above a depleted back.
How Do Recipient Density and Donor Yield Work Together?
Planting too many grafts per square centimeter can compromise blood supply and survival, even when the donor was harvested perfectly. Teams therefore pair recipient density targets with a realistic count of viable follicles. If you need a high visual density but have fine hair, the plan may require more grafts than a coarse-haired patient, which increases pressure on the donor unless staging is used.
Discuss whether you are a good candidate for hair transplantation before focusing on a graft quote. Candidacy review should include donor elasticity, previous surgery, and whether beard or body hair might supplement scalp donor without overusing the nape.
When Is a Second Session the Safer Choice?
A second procedure is not a failure. It is often the ethical path when Norwood stage, donor density, and desired coverage cannot align in one harvest. Waiting for the first session to mature also reveals how native hair responds and where true gaps remain. Rushing a mega-session to avoid a return visit is a common path to overharvest.
Before you commit, ask your surgeon to show donor mapping, expected punch spacing, and the maximum safe yield for your scalp, not an anonymous clinic average. That conversation protects both the result you see in the mirror and the hair you still have at the back.
Sources & clinical references
FAQ
FUE leaves tiny punch scars, usually under 1 mm each. With even extraction and normal healing, the donor can look natural when hair is worn at a typical length, unlike a linear FUT strip scar.
Keep the recipient zone untouched for the first 48 hours while grafts settle. Donor care follows your clinic wash schedule; many patients can gently handle the donor after the first instructed wash.
At a responsible clinic, most patients need one or two well-planned sessions in a lifetime. A third procedure is uncommon and only possible if the first surgeries preserved donor density.
Overharvesting means taking too many grafts from the donor zone or clustering extractions in one patch. It can leave visible thinning, patchiness, and less reserve for future work.
Even spacing protects donor appearance and blood supply. Random heavy zones look moth-eaten; balanced harvesting supports both a natural back and enough grafts for the recipient plan.
The crown can absorb a large share of grafts for limited visual gain, so a surgeon weighs its demand against finite donor reserve. When donor is limited, a staged plan that prioritizes the hairline and mid-scalp first, then revisits the crown once supply and shock loss are reassessed, protects long-term density better than chasing full crown coverage in a single session.

Is It Safe To Travel To Turkey For Hair Transplant?
Each year, hundreds of thousands of health tourists visit Turkey for medical procedures, and hair restoration leads the…
Read More: Is It Safe To Travel To Turkey For Hair Transplant?
Hair Transplant Surgery in The Summer
Hair transplant can be performed in summer when aftercare rules are followed. The season itself is not the main risk…
Read More: Hair Transplant Surgery in The Summer
What Is the Healing Process of the Donor Area?
Donor healing follows phases, not one date. Crusting and early tenderness settle first, temporary shedding can appear…
Read More: What Is the Healing Process of the Donor Area?
Hair Transplantation and the Effect of Scalp Tissue
Scalp tissue quality influences extraction safety, implantation response, and cosmetic durability. Temporary donor…
Read More: Hair Transplantation and the Effect of Scalp TissueDonor Area — Frequently Asked Questions
Expert Answers by Dr. Erkam Caymaz, Istanbul